/
Instant Inspections - User Instructions
/
Using Raptor Flight for Instant Inspection Data Collection
Raptor Flight is Raptor Maps’ software tool for drone service providers and operators to plan and generate flight plans. It allows drone pilots to set different flight parameters and draw a flight plan on map / satellite image of the site. Data collected using the Raptor Flight plans is best adherent to the data collection standards required for the highest quality and accuracy of inspection analysis.
Checklist For Pilots for using a KMZ generated by Raptor Flight
Upload the KMZ, into the transmitter, and then make sure the flight plan covers the desired area in full.
The camera CVI setting should have both visible and IR checked.
The RGB camera should be set to 4k Wide
Ensure that the flight path is not obstructed and the air space is clear.
In the event that a Take Off Point has been specified and terrain follow is enabled the pilot should make sure the flight path from the take off point to the rest of the mission is also clear.
Note: as of February 2024, the pilot should check each waypoint individually to make sure that the altitude values are consistent and accurate.
If flying rooftop/carport, the pilot should verify the altitude offset is correct, by measuring the building or carport height
Image session should contain at least 6 IR+RGB image pairs, and hence minimum 6 waypoints
If the site has different types of mounting: rooftops, carport, ground-mounts: each type should be flown and processed as a separate session
If the site is spread across multiple buildings, each rooftop should be flown and processed as a separate session and uploaded to the same inspection using the “Upload More” feature of the UI.
Additional Resources:
Generating an Instant Inspection Flight Plan with Raptor Flight
Uploading an Instant Inspection Flight Plan into DJI Pilot 2
Raptor Flight settings
For Instant Inspection, several of the flight parameters are pre-filled as soon as “Instant” Inspection Type is selected.
Prefilled Settings
The following settings are prefilled and necessary for the Instant Inspection data collection. They should not be changed. settings are necessary for Instant Inspection and should not be changed:
Inspection Type: Instant
Camera Type: RGB
Altitude: 41.5 m
FOV Horiz: 71.6
FOV Vert: 56.7
Front overlap: 0.7
Side overlap: 0.7
Camera interval: 2 s
Customizable Settings
The following settings should be updated based on the site location, solar array orientation, possible glare on panels etc
Altitude offset: If flying a rooftop or carport array and taking off from the ground, measure the height of the building / carport, check the altitude offset box, and enter the height.
Note that for a site with arrays of differing heights, imagery for each array should be collected separately and uploaded as a unique order.
Camera Angle: -90 is the default value, however, if there is significant glare on the panels due to direction of incident sunlight, this may be adjusted by up to + / - 20 degrees
Flight Angle: This should match the orientation of the solar arrays to enable crab-walk so that drone moves along the solar rows (and not across). Adjust the angle using the satellite image of the site with visible solar array or site drawing if available. Note that (e.g. multiple carports), various arrays may be oriented differently. In such cases, set the flight angle that aligns with most of the arrays.
Terrain Following: Should be enabled for ground mounts, disabled for rooftops, carports, or other flat structures with solar arrays.
Optional steps
Create Take-off point: Clicking on this will create a takeoff point on the map which should be dragged to a suitable location (e.g. section of the parking lot with access and visibility). Once set, this will be incorporated in the flight plan.
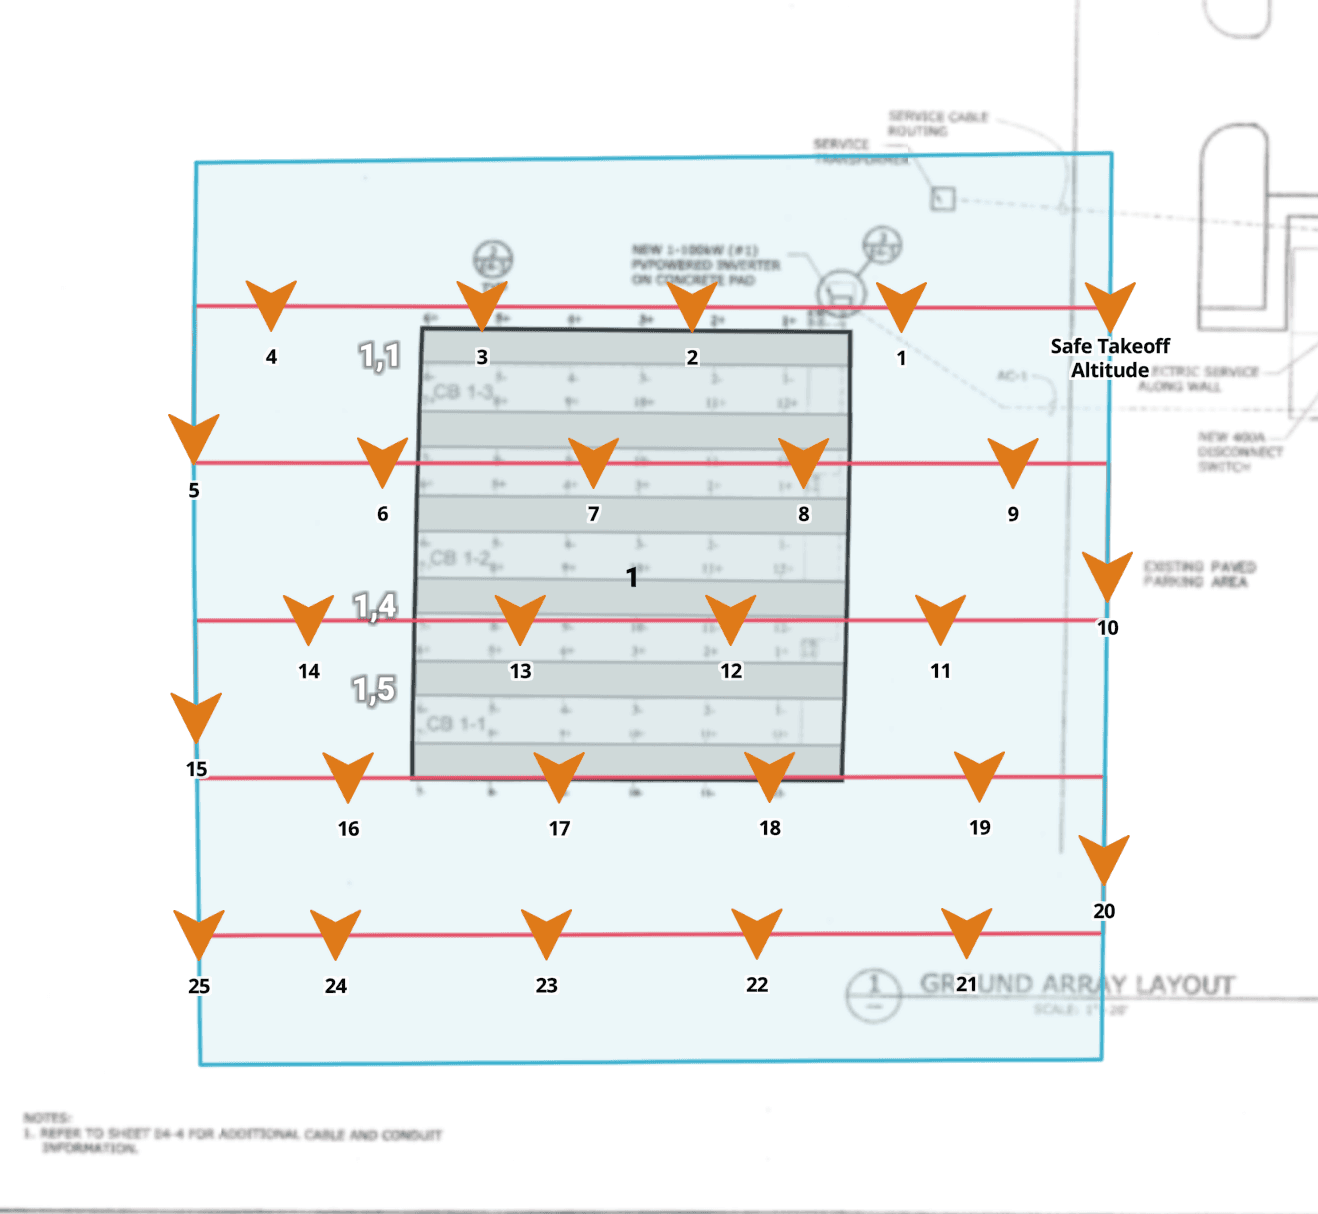
- A note on setting the Flight Boundary -
When building the mission, ensure that there is a full row of imagery being captured outside of the array on all sides. This additional imagery provides more context for the ortho stitching to improve overall accuracy.
Total flight time calculated is longer than the estimated time for Instant Inspections. This is because the “hover and capture” mode used for Instant Inspections, which pauses the drone in-flight for capturing each image.